The multi-track timeline, lane by lane
Most mobile editors give you one strip of clips and call it a timeline. ProCut gives you the thing a desktop editor gives you — stacked lanes on a shared ruler, a magnetic main track, and a playhead that means the same frame everywhere. Here is what each part of that screen is doing.
In short
- Four kinds of lane — video, overlay, audio and text — share one ruler and one playhead, and stack as deep as the project needs.
- The main video track is magnetic: delete a clip and the gap closes. Overlay lanes are free, so a cutaway can sit anywhere.
- Pinch to zoom from whole-project overview down to single-frame precision; edges snap to the playhead and clip boundaries with a haptic tick.
- Thumbnails and waveforms are drawn from the decoded media, not from placeholder shapes — you can find a cut by eye or by sound.
Open a project in ProCut and the bottom two thirds of the screen is the timeline. It is the part of a video editor you actually touch, so it is worth understanding what every row and every gesture is for before you start dragging things around.
What the four lanes do
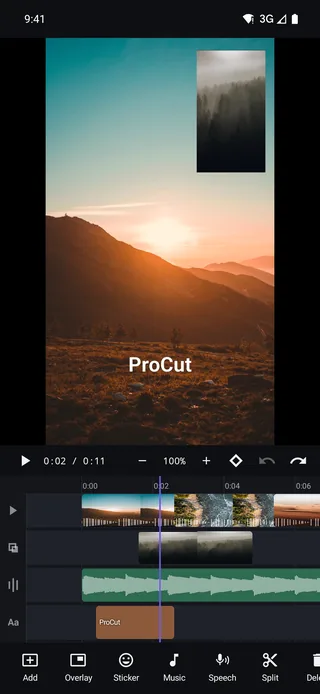
Reading the screenshot from top to bottom, each row is a lane, and each lane accepts one kind of clip. The icon on the left tells you which is which.
| Lane | Icon | Holds | Behaviour |
|---|---|---|---|
| Video (main track) | ▶ | Video and photo clips | Magnetic — clips close ranks when one is removed |
| Overlay | ▣ | A second picture layer over the main track | Free — sits at any time, at any size |
| Audio | ❙❙❙ | Music, extracted audio, voiceover | Free — independent of picture |
| Text | Aa | Titles and captions | Free — trim and keyframe like any other clip |
The lane strip scrolls vertically when a project grows past what fits on screen.
The distinction that matters is magnetic versus free. The main video track is magnetic, which is what you want when you are cutting a story down: delete a boring three seconds and everything after it slides back so there is no black gap. Overlay, audio and text lanes are free, which is what you want for a cutaway, a music bed or a caption that has to land on a specific word — nothing else moves when you nudge them.
One ruler, one playhead, one truth
Above the lanes there is a single time ruler, marked 0:00,
0:02, 0:04, 0:06 in the screenshot, and one
vertical playhead crossing every lane at once. That sounds obvious, but it is exactly
what template-based editors give up: when the caption track and the video track have
their own separate scrubbers, you can never be sure which frame a word lands on.
The counter above the ruler reads 0:03 / 0:11 — position over total.
Both numbers come from the same timeline model the exporter reads, so the duration
you see while editing is the duration of the file you get.
Pinch zoom and frame-level precision
The zoom control sits in the transport bar: −, a percentage, and
+. You can tap those, but the fast way is to pinch on the timeline itself.
- Zoomed out — the whole project fits on screen. Good for judging structure: is the intro too long, does the middle sag.
- 100% — roughly what the screenshot shows. Good for ordinary trimming, where you want a couple of seconds either side of the cut.
- Zoomed in — single frames become wide enough to hit with a fingertip. This is where you place a cut on a beat or on a blink.
Zoom never changes the project. It changes how many pixels a second of footage occupies, and nothing else — cut points are stored as frame numbers against the project frame rate, so a cut you make at 800% is the same cut when you zoom back out.
Magnetic snapping, and how to defeat it
Drag a clip edge and it snaps to the nearest meaningful thing: the playhead, another clip's boundary, the start of the project. On phones with a haptic engine you feel a tick when it catches, which is the difference between guessing and knowing on a screen where your finger covers the thing you are aiming at.
Snapping is a convenience, not a cage. Two ways past it:
- Zoom in. Snap distance is measured in pixels, so at high zoom the snap radius covers a fraction of a frame and you can land anywhere.
- Move the playhead first. If you want an edit at an exact time, park the playhead there and let the clip snap to it deliberately.
Everything lands on the frame grid. If you drop a clip half a frame off, ProCut aligns it to the nearest frame boundary rather than leaving a sub-frame gap that shows up as a stutter in the export.
Thumbnails and waveforms are real data
Look closely at the video lane in the screenshot and you can see the sunset frames change along the clip. The green audio lane shows an actual waveform that rises and falls. Neither is decoration:
- Thumbnail strips are rendered from the clip itself at a spacing that follows your zoom level, so you can find the moment someone turns their head without scrubbing.
- Waveforms are drawn from the decoded audio track. A gap in the wave is silence you can cut; a spike is the clap, the beat drop, or the word you want a caption to hit.
Both are generated during import, alongside the editing proxy, which is why a long clip takes a moment to become fully drawn the first time you add it.
Undo that never runs out
The two arrows on the right of the transport bar are undo and redo. Every edit — a trim, a speed change, a transition, a text tweak — goes onto one history stack, and the stack has no fixed depth. The same stack implementation ships on Android, iPhone, iPad and Mac, so a project behaves identically whichever device you opened it on.
The practical consequence: experiment. There is no state in ProCut you can reach by dragging that you cannot walk back out of.
A five-minute working order
A timeline this flexible is easiest to use in passes rather than all at once. The order that wastes the least time:
- Rough structure first. Zoomed out, drop everything in, delete the obvious dead weight. Do not touch effects yet.
- Trim on the beat. Add music to the audio lane, then use the waveform to place cuts where the track wants them.
- Now the polish. Transitions, speed curves, colour — these consume time from the cut you already like, so they come after the cut is right.
- Titles last. Text sits on its own lane, so it is the cheapest thing to move; adding it early means re-timing it every time you re-cut.
Next in this series: split, trim and ripple delete — the four gestures that turn footage into a cut.
Frequently asked questions
How many tracks can a ProCut project have?
There is no fixed lane limit. Video, audio, text and overlay lanes stack as deep as the project needs; what limits you in practice is your device's decoding capacity when many high-resolution layers play at once.
Does the timeline work the same on iPhone and Android?
Yes. Each platform has its own native engine, but both are built against one shared timeline model and checked against the same golden test numbers, so a project opened on the other device shows the same cuts at the same frames.
Can I edit a 4K clip on an older phone?
Yes. Imports build a 960p proxy that the timeline and preview use, so scrubbing stays smooth on modest hardware, while the export reads your original full-resolution file.
A timeline you can actually feel.
Four lanes, pinch zoom, haptic snapping and unlimited undo — free, with no watermark and no account.
Keep reading
Split, trim and ripple delete
The four gestures that do 90% of editing, and why ProCut stores cuts as frame numbers instead of approximate seconds.
Audio mixing and waveforms
Independent audio lanes, real waveforms, per-clip volume, fades, and the levels that make music and speech coexist.
Overlay and picture-in-picture
A second video layer with its own position, scale, rotation, opacity and grade — the basis of reaction videos, tutorials and product inserts.