Speed curves: ramps you drag with a fingertip
A constant 0.5× is a speed setting. A ramp that drops into slow motion for the landing and accelerates back out is an edit. ProCut ships the second one — a curve editor with control points you drag, four presets to start from, and an honest readout of what your clip now costs on the timeline.
In short
- Speed is edited as a bezier curve over the clip — tap empty space to add a point, drag to adjust, long-press a middle point to delete.
- Four presets to start from: Normal, Montage, Hero moment, Bullet time and a jump-cut ramp.
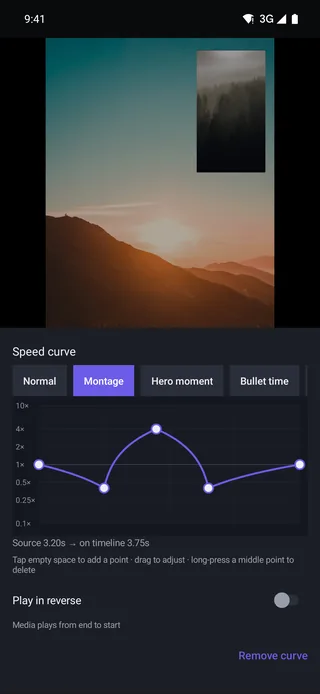
- The readout under the graph shows the honest cost: in the screenshot, source 3.20s → 3.75s on the timeline.
- The vertical axis runs 0.1× to 10×; constant speed is 0.25×–4× and every ramp keeps audio locked to picture.
What the curve editor shows
Select a clip, open Speed, and the bottom half of the screen becomes a graph. Time runs left to right across the clip. Speed runs bottom to top, on a logarithmic axis labelled 0.1×, 0.25×, 0.5×, 1×, 2×, 4×, 10×, so slow and fast get equal room instead of everything below 1× being squashed into a sliver.
The white dots are control points. The line between them is the speed of the clip at every instant. Where the line sits at 1× the clip plays at recorded speed; where it dips to 0.5× you are in slow motion; where it climbs to 4× you are skipping ahead.
The four presets, and what they are for
The chips across the top are starting points, not locked templates — pick one, then drag its points around.
| Preset | Shape | Use it for |
|---|---|---|
| Normal | Flat line at 1× | Resetting a clip, or building a curve from scratch |
| Montage | Dip, sharp climb, dip, recover | Cutting a long take down to its two good moments |
| Hero moment | Fast in, hold slow, fast out | The jump, the pour, the reveal |
| Bullet time | Hard drop to very slow, hard exit | One frozen-feeling instant inside fast action |
| Jump-cut ramp | Step up between plateaus | Compressing dead time without a visible cut |
Presets are applied to the clip you have selected and can be edited immediately.
Adding, dragging and deleting points
The editor spells its own rules out under the graph: tap empty space to add a point · drag to adjust · long-press a middle point to delete.
- Tap anywhere in the graph area to drop a new control point there.
- Drag a point up or down to change speed at that moment, or left and right to change when the change happens.
- Long-press a middle point to remove it. The first and last points are the clip's own ends and stay put.
Between points the curve is smooth — a bezier, not a staircase — so the camera appears to accelerate rather than to teleport between two speeds. That smoothness is the entire difference between a ramp that looks intentional and one that looks like a dropped frame.
Steeper is not better. A ramp that crosses two octaves of speed inside three frames reads as a glitch. If a ramp looks wrong, widen it before you flatten it.
Reading the duration line
Under the graph sits the only number that keeps you honest:
Source 3.20s → on timeline 3.75s.
The left figure is how much of the original clip you are consuming. The right figure is how much room it now occupies on the timeline. Slow parts of the curve stretch the clip; fast parts compress it; the readout integrates the whole curve and gives you the result. When you are cutting to music, this line tells you immediately whether the ramp you just drew still fits the bar.
What happens to the sound
The audio engine follows the same curve as the picture — sound never slides out from under the frame it belongs to. Two settings you should know about:
- Pitch lock is on by default, so a 0.5× ramp does not make a voice sound drunk and a 2× ramp does not make it a chipmunk. Turn it off deliberately when you want the pitch shift as an effect.
- Play in reverse is a toggle right under the graph. It plays the media end to start, audio included, and composes with the curve you have drawn.
Three ramps worth stealing
The two-second attention save
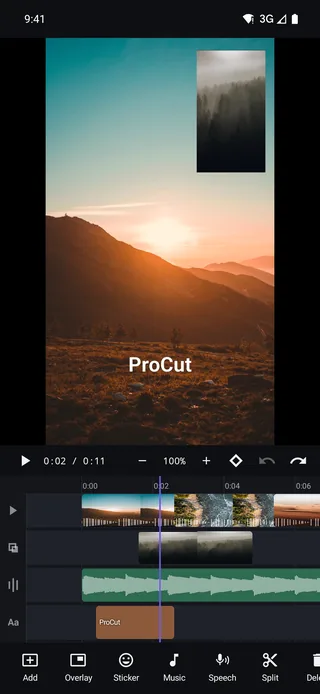
Start Montage, drag the peak up to about 4× and pull it left so the fast section covers your walk-in, then leave the tail at 1×. A long approach becomes a beat, and the moment that matters still plays at real speed.
The impact hold
Hero moment, then drag the low plateau so it starts two or three frames before contact. Slow motion that starts on impact always feels late; the eye needs the wind-up to already be slow for the hit to land.
The invisible edit
Jump-cut ramp across a moment where nothing moves — a static shot of a table, a locked-off wide. Speed compresses ten seconds into three with no cut for the viewer to notice, which is much cleaner than a hard cut in a static frame.
Ramping to a beat
A speed ramp that lands on a musical beat feels designed; one that lands anywhere else feels like the app did something. The method is mechanical:
- Find the beat first. Scrub the music and mark the frame where the hit lands.
- Put the fastest point there — the moment the curve peaks, not the moment the ramp begins.
- Work backwards for the wind-up. The slow section that leads into the peak should start roughly half a second earlier.
- Let it settle after. Return to 1× over the following beat rather than snapping back.
Because changing speed changes duration, do this after the picture edit is roughly locked. Ramping a clip that is still moving around means finding the beat twice.
Speed and pitch: a quick reference
Pitch lock is on by default, so the middle column below is what you get only when you deliberately turn it off — usually because you want the shift as an effect.
| Speed | Without pitch correction | What to do |
|---|---|---|
| 0.25×–0.5× | Deep, slurred, unusable for speech | Keep pitch lock on, or mute and use music |
| 0.5×–0.9× | Noticeably lower, still intelligible | Pitch lock on |
| 1.1×–1.5× | Slightly raised; often fine, sometimes useful | Judge by ear |
| Above 2× | Chipmunked; nobody wants this by accident | Mute the clip, or lock the pitch |
For a montage under music, the simplest answer is usually to mute the ramped clip entirely and let the track carry it — see the mixing guide for how to keep the rest of the mix steady while one clip drops out.
Related reading: slow motion, reverse and freeze frame covers the simpler constant-speed tools and when they beat a curve.
Frequently asked questions
What is the speed range in ProCut?
Constant speed runs from 0.25× to 4× per clip. The curve editor's axis spans 0.1× to 10× so ramps have room to breathe at both ends.
Does slow motion interpolate new frames?
No. ProCut re-times the frames you shot. For genuinely smooth extreme slow motion, record at a high frame rate — 60, 120 or 240 fps — and then ramp it down.
Can I put a speed curve on part of a clip only?
Yes — split the clip at the point where the effect should begin and curve only the half you want. Splitting keeps the rest of the clip's settings intact.
Bend time with your thumb.
Bezier speed curves, four presets, reverse and pitch lock — in the free tier, on every platform.
Keep reading
Slow motion, reverse, freeze frame
The three constant-speed tools, why pitch lock is on by default, and how to shoot footage that survives being slowed down.
Split, trim and ripple delete
The four gestures that do 90% of editing, and why ProCut stores cuts as frame numbers instead of approximate seconds.
Transitions with real overlap
Dissolve, fade, slide, zoom, wipe and blur swap — with true clip overlap and an audio cross-fade that rides along automatically.