Filters and colour: making six clips look like one video
The fastest way to make a video look amateur is to cut between a warm indoor shot and a blue outdoor one and leave them as they came off the camera. ProCut's colour panel is two tools: a filter for the look you want, and four sliders for the match nobody notices when you get it right.
In short
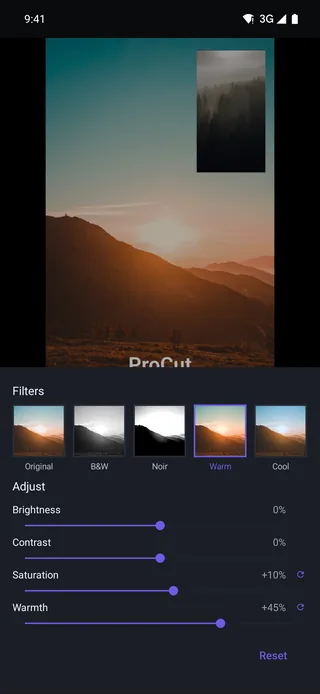
- Six looks ship today: Original, B&W, Noir, Warm, Cool and Vivid, each previewed on your own frame rather than on a stock thumbnail.
- Four sliders under Adjust — Brightness, Contrast, Saturation, Warmth — stack on top of whichever filter is selected.
- Colour is per clip, so a mismatched shot gets fixed without touching the rest of the edit.
- Everything renders on the GPU in the same pipeline preview and export share; Reset returns a clip to untouched at any time.
What the colour panel gives you
Select a clip, tap Filters, and the panel splits into two halves. The top row is a set of one-tap looks, each rendered on the current frame of the clip you selected — so you are judging the filter on your footage, not on someone else's sample image. The lower half, headed Adjust, is four sliders for correction.
That split matters. A filter is a creative choice; adjustment is a repair. Mixing them up is how you end up with a video where every shot looks stylish and none of them look like they belong together.
The six looks
| Filter | What it does | Reach for it when |
|---|---|---|
| Original | No look applied | Your footage is already graded, or you only need the sliders |
| B&W | Clean monochrome | Mixed lighting you cannot reconcile; documentary feel |
| Noir | Monochrome with crushed blacks and lifted contrast | Drama, high-contrast portrait footage |
| Warm | Amber shift, gentle skin flattery | Golden hour, interiors, food, anything with people |
| Cool | Blue shift | Night, city, tech, product shots |
| Vivid | Saturation and contrast lift | Flat footage that needs punch — travel, sport |
Filters are single-tap and instantly reversible: tap another one, or tap Original, and the clip is back. Nothing is baked in until export.
The four sliders, in the order to use them
The screenshot shows the default state for three of them — Brightness 0%, Contrast 0%, Saturation +10% — with Warmth pushed to +45%. Each is a signed percentage, so you always know how far you have gone from neutral, and a long press resets one slider without disturbing the others.
Work them in this order. It is the same order a colourist works in, and it saves undoing your own decisions:
- Brightness — get the overall exposure right first. Everything downstream depends on it.
- Contrast — set how far apart the darks and lights sit. Phone footage is often flat and wants a small positive push.
- Warmth — fix the white balance. This is the slider that makes two shots belong to the same room.
- Saturation — last, and gently. It amplifies whatever the previous three left behind, including mistakes.
Judge colour on a screen at a sensible brightness, not at 15% in a dark room. A grade set on a dimmed phone is almost always too bright and too saturated when it reaches anyone else.
Matching shots: the actual job
The unglamorous work that separates a decent edit from a good-looking one is matching — making cuts stop drawing attention to themselves.
- Pick a reference. Choose the best-looking shot in the video and grade it until you like it. That shot is now the target.
- Fix the rest towards it, one at a time, using the sliders — not the filters. Brightness first, then warmth.
- Check at the cut, not on the clip. Park the playhead a second before the join and play through. Colour problems live at joins; a clip judged in isolation always looks fine.
- Apply the look last. Once everything matches, pick one filter and apply it consistently.
Two clips shot minutes apart on the same phone can be a long way off each other — auto white balance drifts. Warmth is usually the whole fix.
Per-clip is the point
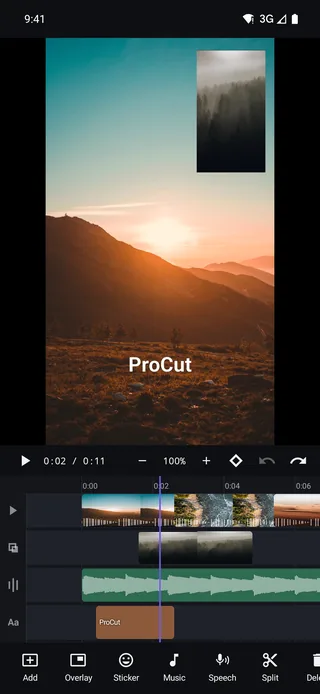
Colour attaches to the clip, not the project. Consequences worth knowing:
- The one shot that came out too blue gets corrected without changing anything else.
- Duplicating a clip copies its grade, so you can grade once and reuse.
- Splitting a clip gives both halves the same grade — useful when you want the same look either side of a speed ramp.
- A picture-in-picture overlay is graded independently of the shot behind it.
Non-destructive, GPU-rendered
Filters and adjustments are stored as parameters in the project, not burned into pixels. Your source files are never modified, Reset puts any clip back to untouched, and undo walks back through colour changes like any other edit.
Rendering runs on the GPU through each platform's native stack, so scrubbing a graded timeline stays smooth and export does not slow down because you used colour. Preview and export run the same pipeline — what you grade is what encodes.
What is not here yet
To be straight about it: importing your own .cube LUT files and
per-clip curve controls are on the roadmap, not in the shipping build. What you have
today is six looks and four sliders. For the vast majority of social and travel edits
that is the whole job — but if you came here expecting LUT import, that is the honest
answer.
Next: keyframes, which let any of these values change over the length of a clip instead of staying fixed.
Frequently asked questions
Do filters change my original video file?
No. Colour is stored as parameters in the project and applied at render time. Your source media is never written to, and Reset returns the clip to untouched.
Can I apply one filter to the whole project at once?
Colour is applied per clip. Grade one clip, then duplicate it or apply the same filter to the others — per-clip control is what lets you fix a single mismatched shot.
Does ProCut support LUT files?
Not in the shipping build. Importing .cube LUTs is on the roadmap; today the app offers six built-in looks plus Brightness, Contrast, Saturation and Warmth.
Make the cuts stop showing.
Six looks, four correction sliders, GPU-rendered and fully non-destructive — free, with no watermark.
Keep reading
Keyframes and Ken Burns moves
Scale, position, rotation, opacity and volume can all animate. Set two points, and the engine interpolates every frame in between.
Transitions with real overlap
Dissolve, fade, slide, zoom, wipe and blur swap — with true clip overlap and an audio cross-fade that rides along automatically.
Export presets and 4K HEVC
720p, 1080p, 1080p high, 4K and 4K HEVC — plus a photo export of the current frame, all through your device's hardware codec.