Keyframes: make any value change over time
A keyframe is a promise: at this exact frame, this value is this. Set two of them and the engine fills in everything between. It is the difference between a static photo and a slow push-in, between a hard mute and a fade under dialogue.
In short
- Animate scale, position, rotation, opacity and volume — set a value at one frame, set a different one later, done.
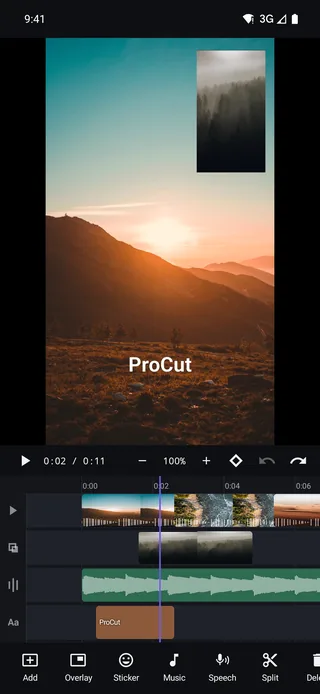
- The diamond button above the timeline adds a keyframe at the playhead; keyframed clips show markers on the clip itself.
- Ken Burns — a slow push or drift across a still — is two keyframes, and it is what stops photos from killing the pace of a video.
- Animation survives editing: splitting a keyframed clip re-times the motion across both halves instead of resetting it.
What can be keyframed
| Property | Animating it gives you | Applies to |
|---|---|---|
| Scale | Push in, pull out, Ken Burns zoom | Video, photo, overlay, sticker, text |
| Position | Pans, drifts, an overlay that slides in | Video, photo, overlay, sticker, text |
| Rotation | Tilts, spins, playful entrances | Overlay, sticker, text |
| Opacity | Fade a layer up or down independently of the cut | Overlay, sticker, text |
| Volume | Manual ducking under a voiceover; fades | Any audio-bearing clip |
Setting keyframes: the diamond
The workflow is the same for every property:
- Select the clip and move the playhead to where the motion should start.
- Set the value you want there — pinch the preview to scale, drag to position.
- Tap the diamond to lock that value at that frame.
- Move the playhead to where the motion should end, change the value again.
The second keyframe is created automatically when you change a value on a clip that already has one — you rarely tap the diamond twice. Between the two, the engine interpolates continuously, so there is no stepping and no visible jump.
Keyframed clips draw small markers on the clip in the timeline, so you can see at a glance which shots are animated and roughly where the motion sits.
The Ken Burns move, step by step
Photos are the reason keyframes exist for most people. A still image on a timeline is dead air; a still image with a slow push has energy, and viewers stop scrolling.
- Drop the photo on the timeline and give it four to six seconds.
- Playhead at the start: scale to about 105% and position on the part of the frame that matters. Tap the diamond.
- Playhead at the end: scale to about 118% and shift position slightly towards your subject.
- Play it back. If you can consciously see the zoom happening, it is too much.
Start at 105% rather than 100%. A photo scaled slightly above full frame has room to move without exposing an edge, and it hides minor framing problems in the original.
Alternate direction between consecutive photos — push in on one, pull out on the next — and a sequence of stills stops feeling mechanical.
Easing, and why linear looks robotic
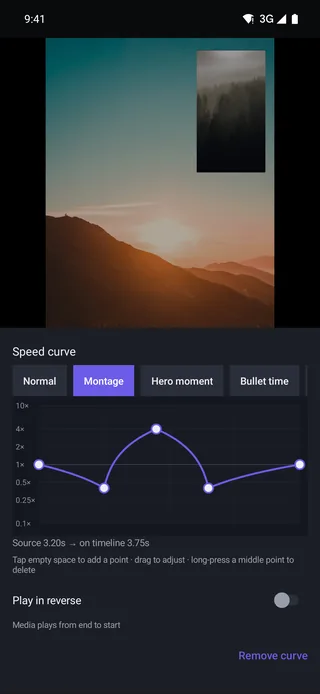
Interpolation between keyframes is smoothed rather than strictly linear. Real cameras and real hands do not start at full speed and stop dead; motion accelerates in and decelerates out. That is the entire reason a keyframed move can read as a camera operator rather than as an animation.
If a move still feels mechanical, the usual culprits are: too much distance in too little time, or motion that starts and stops exactly on the cut. Let the move begin slightly before the clip's midpoint and end slightly after, and it stops announcing itself.
Keyframed volume: ducking by hand
Volume keyframes are the quiet workhorse. Music at 100% under an intro, dropped to about 20% for the two seconds someone speaks, back up afterwards — that is four keyframes and it is what makes a video sound produced.
Doing it by hand rather than with an automatic ducker means you control exactly when the dip starts, which matters when the speaker takes a breath before the first word. There is more about lanes and levels in the audio guide.
What happens when you cut a keyframed clip
This is where a lot of mobile editors fall over. In ProCut:
- Split re-times the animation across both halves, so a push-in continues through the cut rather than snapping back to its start value.
- Trim keeps keyframes at their frames; trimming past a keyframe removes that keyframe from the visible range but leaves the rest intact.
- Duplicate copies the whole animation with the clip.
- Speed changes re-time keyframes along with the picture — a move inside a slow-motion ramp slows down with it.
Three moves that are always enough
- The slow push. 105% → 118% over four seconds. Works on almost any still and on locked-off video that needs life.
- The reveal drift. Start framed on a detail, drift out to the wide. Position plus scale, in one move.
- The overlay entrance. Opacity 0 → 100 with a small scale change, over about eight frames, for a logo or a picture-in-picture inset.
Four movements worth memorising
Almost every useful camera move on a still or a locked-off shot is one of these, and each is two keyframes.
| Move | Start | End | Reads as |
|---|---|---|---|
| Slow push in | Scale 100% | Scale 110% | Attention narrowing — good under narration |
| Slow pull out | Scale 115% | Scale 100% | A reveal; the context arrives last |
| Drift across | Position left | Position right | A landscape being taken in |
| Settle | Scale 106%, rotated 1° | Scale 100%, rotated 0° | The shot coming to rest |
Keep the amount small. A 10% push over four seconds is barely perceptible frame to frame and completely obvious in effect — which is exactly what you want. A 40% push over the same four seconds looks like a mistake.
Where to put the keyframes
Two keyframes at the very start and very end of a clip give constant-speed motion, which is the one thing real camera moves never do. Two habits fix it:
- Inset them. Put the first keyframe a few frames after the clip starts and the last a few frames before it ends. The move now begins after the shot has landed and finishes before the cut.
- Add a third in the middle, off-centre. Placing it slightly past halfway makes the motion decelerate towards the end, which is what a hand or a motorised head actually does.
Both work on titles and overlays as well as picture — a title that drifts a few pixels while it is on screen looks composed, and a static one looks pasted.
Related: text and titles — which use exactly the same keyframe system for their entrances.
Frequently asked questions
How many keyframes can one clip have?
There is no fixed limit. In practice two or three per property is enough — dense keyframing usually reads as jitter rather than as motion.
Does the Ken Burns effect reduce image quality?
Scaling above 100% crops into the image, so a very large zoom on a low-resolution photo will soften. Keep pushes modest, or start from a high-resolution still.
Can I animate text the same way?
Yes. Text clips accept scale, position, rotation and opacity keyframes, which is how you build a custom title entrance rather than picking a canned one.
Nothing has to sit still.
Keyframe scale, position, rotation, opacity and volume — with smoothing, and animation that survives your edits.
Keep reading
Filters and colour adjustment
Six looks, four adjustment sliders, and the discipline that turns mismatched footage into something that reads as a single piece.
Text, titles and captions
Text is a clip, not a sticker — trim it, keyframe it, stack it. Plus the safe-area rules that keep captions off the UI of every app you post to.
Overlay and picture-in-picture
A second video layer with its own position, scale, rotation, opacity and grade — the basis of reaction videos, tutorials and product inserts.